This is my first project for the Altenew Educator Certification Program. I made 2 cards for this project.
Both cards used the Craft your life Garden Rose stamp set. On the first card took a piece of watercolor cardstock and squished oxide ink on my glass work surface, sprayed it with some water and dabbed the panel a few times, drying the panel in between each pass. I used distress oxide inks for the background as they are water reactive. After the panel dried I sprayed it with Altenew jet black spray and then to add a little bit of dimension, I took a stencil and used texture paste over it. I also used a text stamp in the upper left hand corner which is barely visible but adds a subtle touch. The sentiment is from the Altenew Hugs and Hello set and stands out perfectly on the background. The larger panel and the hugs sentiment are cut from black glitter paper. Little silver baubbles finish off the card.
On this card, I didn't use all three layers. That is one thing I love about Altenew's layering stamps, you have so many options, this would have looked great just with the outline as well (one layer). So essentially you have very different looking flowers with just one stamp set...which adds tons of value.
On my second card, I used the stamp with all 3 layers (although if you buy the kit you can also color the top layer with the coordinating stencil).
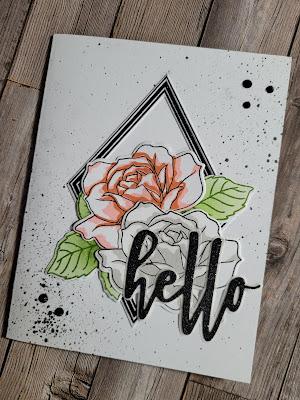
On this card I used the Geo Frames and die set...I got this set a long time ago and I finally got to use it. I can tell you it really makes a difference on a card and I will be using it a lot more now that finally opened it! The roses are the same flowers from the Garden Rose that I used on the last card but on this card I used the three layers one flower used pinks and the other greys.
The background was kept simple using Altenew Jet black spray and a few little black sequins finished it off.
All about layering 1 is a fun class and if you have any of the Altenew laying stamps it a great place to start. One thing I learned using this set is the the more you practice with it...the better you are at lining it up. I am sure you can say that for most things but it is true that the more you work with the set the easier it gets. And it is fun to practice so it is a win-win!


Comments
Post a Comment